When your television powers on, emits crisp audio from cable boxes or streaming apps, but presents a completely dark display, the culprit is almost always a failure within the LCD panel's backlight assembly. This guide will walk homeowners and DIY enthusiasts through simple soft resets, performing the flashlight test, using a backlight tester tool, and evaluating whether you should replace LED strips in the TV or consult a repair specialist.
1. Quick Initial Check: Soft Resets & Power Cycling
Before taking off the back panel or purchasing tools, rule out temporary logic lockups or HDMI handshake glitches.
Step-by-Step Power Reset Procedure:
- Unplug the TV: Disconnect the power cord directly from the wall outlet.
- Discharge Residual Power: Press and hold the physical power button on the TV chassis (not the remote) for 30 to 60 seconds.
- Wait: Leave the unit completely unpowered for at least 10 minutes.
- Reconnect Directly: Plug the power cord back directly into a wall socket—avoid power strips or surge protectors during diagnosis.
- Test Audio & Video: Power the TV on and play content with audio.
If the display remains dark while audio plays, proceed directly to the diagnostic test below.
2. Diagnosing "Sound but No Picture": The Flashlight Test
Modern LED TVs rely on two main visual components: the LCD matrix (which creates the image colors and shapes) and the LED backlight array (which shines light through the LCD panel so your eyes can see it). When the backlight array or backlight driver circuit fails, the LCD still functions—you just can't see the image without an external light source.

Figure 1: Directing a high-lumen light source at a 45-degree angle to detect faint liquid crystal images during a LED TV repair black screen diagnosis.
How to Perform the Flashlight Test:
- Prepare the Room: Turn off overhead lights and close blinds to make the room as dark as possible.
- Supply Audio Signal: Turn on the TV and play a source with active video content (e.g., a movie or news channel with on-screen text/logos).
- Position the Flashlight: Grab a bright flashlight or use your smartphone flash.
- Inspect the Screen: Hold the light source roughly 1 to 2 inches away from the glass screen. Angle the light beam sideways at roughly 45 degrees while searching for faint text, menu outlines, or moving figures.
- Check Multiple Areas: Move the light around the center and corners of the display. Try pulling up the TV settings menu via the remote.
Interpreting Your Test Results:
- Faint Images Visible: The LCD panel, T-Con board, and main board are functioning properly. The fault is strictly isolated to the LED backlight strips, the LED driver board, or power supply rails.
- No Image Visible (Pure Black Screen): The issue likely extends beyond the backlights—such as a failed T-Con (Timing Control) board, bad main board, blown power supply fuse, or a damaged LCD panel.
3. Isolating the Fault: LED Strips vs. Driver Board
Once you've confirmed faint images with the flashlight test, you need to determine whether individual LED diodes on the strips are open-circuit/shorted or if the power supply unit (PSU) isn't outputting required DC voltage.
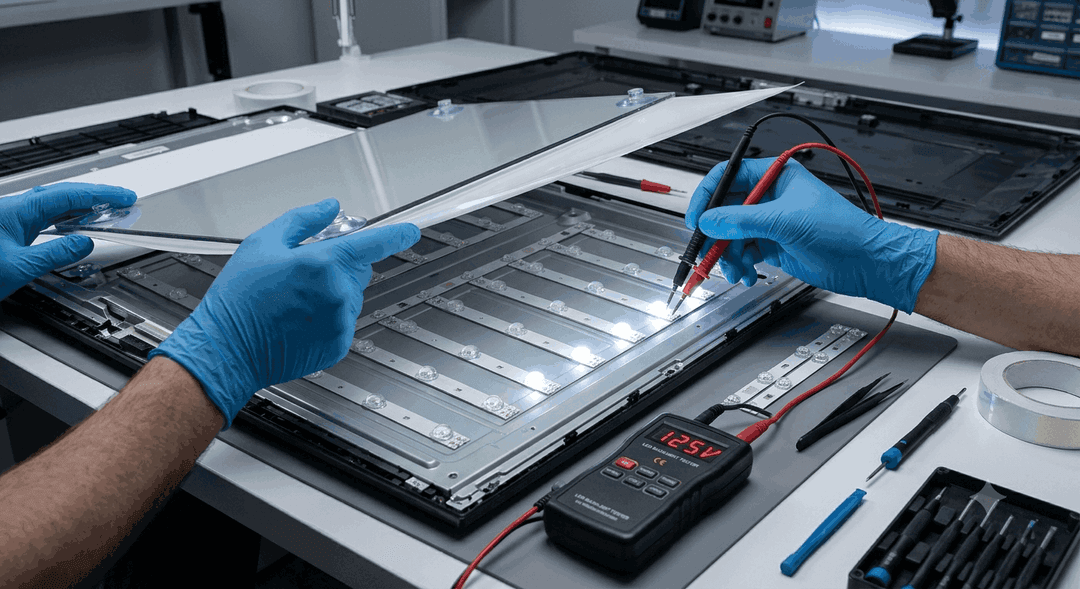
Figure 2: Utilizing a specialized backlight tester tool to verify strip voltage and individual diode light output without opening the TV chassis panels prematurely.
Using a Dedicated Backlight Tester Tool:
A backlight tester tool is a constant-current, variable-voltage power generator that allows safe testing of TV backlights directly through the power board harness or on individual strips:
- Disconnect the TV from wall power.
- Remove the back cover panel.
- Unplug the multi-pin LED output cable connecting the main power board to the screen panel.
- Connect the backlight tester probes to the positive (+) and negative (-) terminals of the LED cable connector.
- Observe the voltage readout on the tester:
- Strips Illuminate & Voltage Stabilizes: The backlights work; the fault lies in the power board's LED driver circuit.
- Strips Remain Dark or Voltage Maxes Out: One or more LEDs on the strips have failed as an open circuit. You will need to replace LED strips in the TV.
4. How to Replace TV Backlights (Overview & Best Practices)
If your diagnostic tests point to bad LED strips, performing a full array replacement restores factory display brightness.

Figure 3: Careful removal of the fragile LCD cell, optical diffuser sheets, and reflective liner to access the underlying matrix when learning how to replace TV backlights.
Essential Precautions:
- LCD Glass Handling: Large LCD panels (50"+) are extremely thin, flexible, and fragile. Use suction cups and never twist or bend the panel.
- Replace in Full Sets: Always replace all LED strips at once rather than soldering single replacement diodes. Old diodes nearby will have degraded thermal life and will fail shortly after.
- Sourcing Quality Parts: Refer to the spare parts matrix in the table below to select genuine OEM or high-grade generic aluminum-core replacement strips.
| Feature / Metric | Genuine Spares (OEM) | High-Grade Generic Parts | Clones | Fake Parts |
|---|---|---|---|---|
| Build Quality & Reliability | Factory original, exact heatsink matching, 100% lifespan rating | Aluminum core substrate, good thermal dissipation, 85-90% lifespan | Thin FR-4/paper-phenolic base, prone to rapid overheating, 40-50% lifespan | Substandard specs, mismatched voltage drops, high initial failure rate |
| Voltage & Current Tolerances | Strict spec compliance (e.g., 3V/6V per LED exact curve) | Tight tolerances (±3% voltage drift across strip) | Inconsistent current draw, causes driver board power trips | Unstable forward voltage, instant burnout under load |
| Cost-to-Longevity Ratio | Higher upfront cost (R810–R1,440), 5+ years expected service | Moderate cost (R450–R810), 3-5 years expected service | Low cost (R215–R360), 6-12 months expected service | Very low cost (R90–R180), fails within weeks or DOA |
5. Summary Diagnostic Flowchart
[TV Has Sound, No Picture]
│
▼
Perform Soft Reset
│
┌─────┴─────┐
▼           ▼
[Fixed?]    [Not Fixed]
│            │
▼            ▼
(Done)   Flashlight Test
│
┌──────┴──────┐
▼             ▼
[Faint Image]   [No Image]
│             │
▼             ▼
Backlight System    Check T-Con / Main Board /
Failure Detected    Power Supply Rails
By following this systematic approach—from basic power cycling to the flashlight test and targeted LED array testing—homeowners can confidently diagnose display faults and decide on the best path forward for repair.
Experiencing a similar issue? Contact us for a no-obligation quote. We're here to help.
If you know what parts to look for, please visit Tech and Bids to search for what you need.