Purchasing an Apple device—whether brand new, refurbished, or pre-owned—often brings up a crucial question: Is your iPhone or MacBook a local regional unit or an imported international model?
Determining your device's origin affects more than just its resale value. It dictates your warranty coverage, hardware compatibility (such as dual physical SIM vs. eSIM), regional support policies, and repair eligibility at authorized service centers.
In this comprehensive guide, we will walk you through performing an Apple serial number check, reading model numbers, understanding warranty rules, and diagnosing whether common device fault codes require a basic reset or professional assessment.
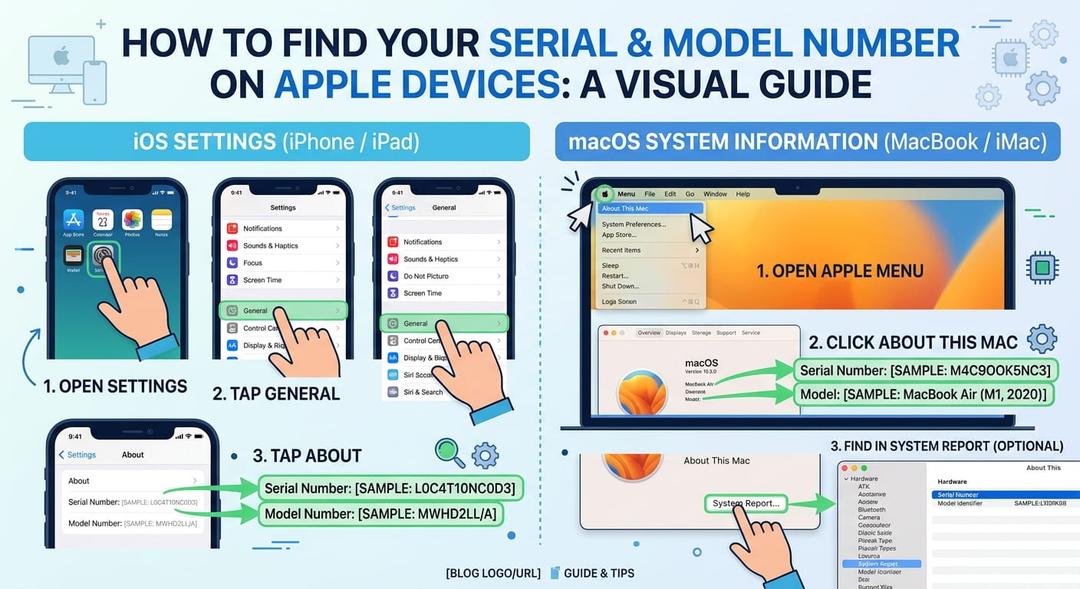
Figure 1: Locating your Apple Serial Number and Model Number across iOS and macOS settings.
Why Regional Origin Matters for Apple Devices
While Apple products maintain uniform build quality globally, regional variations exist to comply with local telecommunication laws, cellular bands, and consumer regulations.
Key Regional Differences:
- Warranty and Service Restrictions: Apple’s Limited Warranty for hardware is technically international, but cellular devices (iPhones and iPads with Cellular) may be restricted to servicing within the original region of purchase due to regional part availability.
- SIM & Cellular Hardware: US-market iPhones (starting from iPhone 14) rely exclusively on eSIM, omitting the physical SIM tray entirely. Conversely, models built for Hong Kong (
ZA/A) feature physical dual-SIM trays. - Regional Features: Japanese models (
J/A) historically enforced non-mutable camera shutter sounds when connected to Japanese cellular networks, while UAE models (AB/A) previously faced FaceTime restrictions depending on regional firmware setup.
Step 1: Finding Your Serial Number & Model Number
Before checking your device's origin, you need two pieces of information: the Serial Number and the Model Number.
On iPhone or iPad:
- Open Settings > General > About.
- Locate Serial Number for warranty checks.
- Tap Model Number to toggle between the part number (e.g.,
MQ883LL/A) and the model number (e.g.,A2894).
On MacBook or Mac Desktop:
- Click the Apple Menu () in the top-left corner of your screen.
- Select About This Mac.
- View your Serial Number directly on the summary window.
- For deeper technical details, click System Report > Hardware.
Step 2: Decoding the Region Code
The part number (found right before the /A suffix in your model string) reveals the market your device was produced for.
For example, in the part number MU793LL/A:
LL/Aidentifies the unit as a United States model.
Popular Apple Region Codes Reference Table
Refer to the metadata table below to cross-reference common regional codes and their hardware/warranty characteristics:
| Code | Region | 5g Band Support | Sim Type | Warranty Notes |
|---|---|---|---|---|
| LL/A | United States | mmWave & Sub-6GHz | eSIM Only (iPhone 14 & newer) | US Coverage; AppleCare+ global |
| ZA/A | Hong Kong / Macao | Sub-6GHz Only | Physical Dual SIM | Regional restrictions may apply for cellular units |
| ZP/A | Singapore / Malaysia | Sub-6GHz Only | Single SIM + eSIM | Standard international support options |
| HN/A | India | Sub-6GHz Only | Single SIM + eSIM | Requires local tax invoice for official service |
| B/A | United Kingdom | Sub-6GHz Only | Single SIM + eSIM | Consumer Law rights limited to UK purchase region |
| J/A | Japan | Sub-6GHz Only | Single SIM + eSIM | Camera shutter sound cannot be muted on local networks |
Checking Official Warranty Status & "Find My" State
Once you have identified your serial number, check your official coverage status:
- Visit Apple’s official portal:
checkcoverage.apple.com. - Enter your serial number and security captcha.
- Review your Estimated Expiration Date, AppleCare+ Status, and Valid Purchase Date.
The Role of "Find My Device" in Warranty & Service
Before submitting any local or international unit for technical assessment or repair, Find My Device (Activation Lock) must be turned off.
- Why it matters: Authorized Service Providers cannot run hardware diagnostic suits or initiate unit replacements while Activation Lock is active.
- How to turn off Find My: Go to Settings > [Your Name] > Find My > Find My iPhone, then toggle it OFF using your Apple Account credentials.
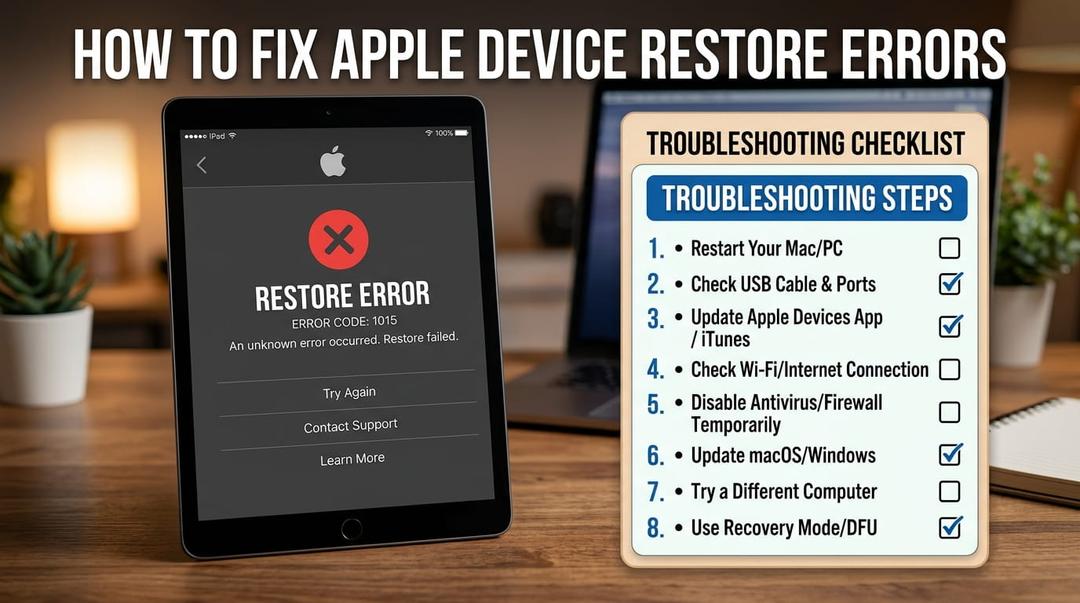
Figure 2: Evaluating whether system error codes require software resets or official hardware assessment.
Fault Code Diagnostics: Basic Reset vs. Hardware Assessment
When an iPhone or MacBook encounters system failures—whether it is a local or international unit—identifying whether the issue stems from temporary software corruption or permanent hardware damage saves time and money.
Troubleshooting Flowchart: When to Reset vs. Book an Assessment
                     [ Device Experiencing Error Code ]
                                     |
                                     v
                       Is it a Software Error Code?
                       (e.g., Error 9, 14, 4013, 4014)
                                  /     \
                                 /       \
                              YES         NO
                              /             \
                             v               v
            [ Perform Forced Restart ]     [ Hardware / Panic Fault ]
                     |                     (e.g., Panic Full Log)
                     v                               |
             Did Restore Succeed?                    v
               /             \             [ Check Find My Status ]
              /               \                      |
           YES                 NO                    v
            |                   |          [ Book Authorized Repair ]
            v                   v
     [ Issue Solved ]   [ Escalate to Hardware Assessment ]
Common Fault Codes and Recommended Actions
| Code | Symptom | Initial Action | Severity | Recommendation |
|---|---|---|---|---|
| Error 4013 / 4014 | Disconnect during iTunes/Finder update or restore | Basic Reset / Cable Swap | Moderate | Try recovery mode using original cable. If persistent, requires technician hardware assessment. |
| Panic Full / Kernel Panic | Unexpected daily restarts, log entry in Privacy settings | Software Log Inspection | High | Inspect log for thermal or sensor failures (e.g., prs0, mic1). Hardware assessment required. |
| Error 9 / 14 | Device frozen on Apple logo during reboot or update | DFU Restore / Storage Clean | Moderate to High | Perform DFU restore. If storage is full or NAND corrupt, professional repair is needed. |
| Unable to Activate | Activation server unreachable or baseband invalid | Network Reset / Find My Check | High | Toggle Wi-Fi and verify Find My Device status. If baseband chip is damaged, seek authorized support. |
How to Perform Basic Resets Before Escalate
If your device exhibits software fault codes, complete these basic resets prior to seeking technical support:
1. Force Restart (iPhone 8 through iPhone 16 Series)
- Press and quickly release Volume Up.
- Press and quickly release Volume Down.
- Press and hold the Side Button until the Apple logo appears, then release.
2. DFU (Device Firmware Update) Restore
- Connect your device to a Mac (via Finder) or PC (via Apple Devices app).
- Place the unit into DFU mode. This completely wipes and re-writes the firmware, clearing deep-seated software corruption.
3. macOS SMC & NVRAM Reset (Intel MacBooks)
- For older Intel-based MacBooks, clearing NVRAM/PRAM or resetting the System Management Controller (SMC) resolves power management, thermal fan, and display fault codes.
- Note: Apple Silicon MacBooks (M1/M2/M3/M4) perform automated hardware resets during standard system restarts.
Summary: Managing International vs. Local Units
- Verify your Part Number: Use the country code (e.g.,
LL/A,ZA/A) to confirm your device's origin market. - Understand Warranty Constraints: Standard hardware coverage is generally accessible globally, but cellular device component swaps may require sending international units back to their country of purchase.
- Run Diagnostic Steps First: Resolve fault codes like
Error 4013orError 14using basic resets and DFU mode before concluding it is a hardware failure. - Prepare for Service: Always disable Find My Device and back up your data prior to handing over any device for an official hardware assessment.
Experiencing a similar issue? Contact us for a no-obligation quote. We're here to help.
If you know what parts to look for, please visit Tech and Bids to search for what you need.