It is a familiar scenario: you place your meal inside the microwave, select two minutes, press start, and hear the familiar hum of the turntable spinning—only to pull out a plate of stone-cold food.
When a microwave runs normally but fails to output heating power, most people assume the expensive magnetron has failed and consider replacing the entire appliance. However, in up to 70% of non-heating cases, the culprit is actually a small, inexpensive component: the microwave high-voltage diode, a part that often costs under R450.
In this guide, we will walk you through diagnosing high-voltage circuit failures, decoding common oven fault codes, understanding when a basic reset works, and knowing when a professional assessment is mandatory.
CRITICAL SAFETY WARNING: Microwaves store lethal voltages inside their high-voltage capacitors—even when unplugged from the wall. Never open a microwave chassis or touch internal components without fully discharging the high-voltage capacitor using an insulated jumper tool.
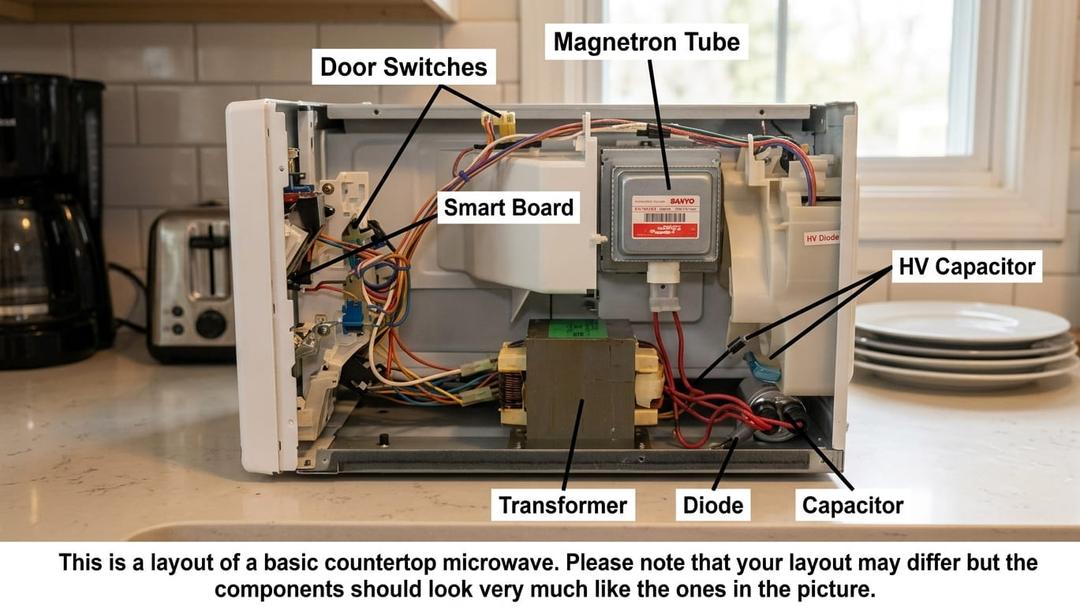
Figure 1: Locating the high-voltage diode connected between the high-voltage capacitor and the metal chassis frame.
How the High-Voltage Circuit Works
To produce microwave radiation that vibrates water molecules and heats food, your microwave relies on a high-voltage loop consisting of four core components:
-
High-Voltage Transformer: Steps up standard 230V household power to approximately 2,000V AC.
-
High-Voltage Capacitor: Doubles the voltage up to nearly 4,000V DC when paired with the diode.
-
Microwave High-Voltage Diode: Converts AC to DC power and helps pump high voltage directly into the magnetron.
-
Magnetron: The vacuum tube that converts high-voltage DC electricity into 2.45 GHz microwave radiation.
If the high-voltage diode burns out or shorts to ground, the voltage doubling circuit collapses. The transformer will continue to hum, and the turntable will continue to turn, but zero thermal energy reaches your food.
Step 1: Evaluating Symptoms (Diode vs. Magnetron vs. Fuse)
Before attempting a hardware repair, cross-reference your microwave's behavior against the breakdown table below:
| Symptom | Primary Suspect | PartCost Estimate | Action Required | Assessment Level |
|---|---|---|---|---|
| Loud humming noise + zero heating | Microwave High-Voltage Diode | R150 - R450 | Basic multimeter diode test; replace if shorted. | Moderate (DIY accessible if capacitor is safely discharged) |
| Normal sound + internal arc/sparks + burning smell | Magnetron / Waveguide Cover | Inspect waveguide cover for carbon spots; test magnetron terminals for ground shorts. | ||
| Microwave runs for 3-5 seconds then shuts off | Door Interlock Switch / Thermal Cutoff | Test microswitches for continuity; reset thermal fuse. | Low to Moderate (Basic reset / switch replacement) | |
| Complete loss of power mid-cycle | Main Line Fuse (20A Ceramic) | Check line fuse for continuity; investigate underlying short before replacing. | Low (Basic component swap) |
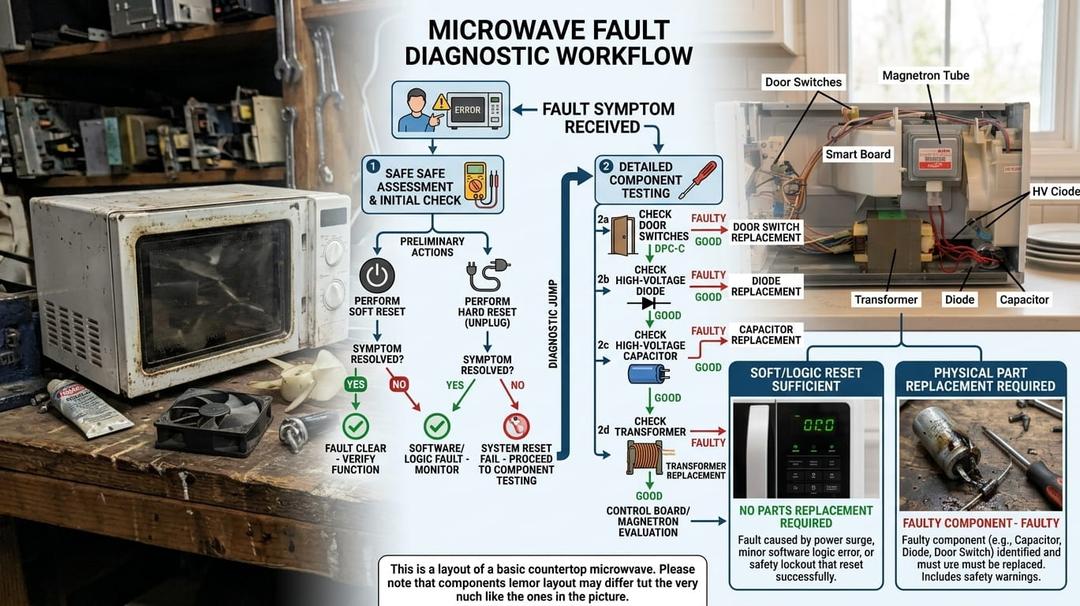
Figure 2: Workflow for evaluating whether microwave fault symptoms require software resets or physical part replacement.
Step 2: Testing the Microwave High-Voltage Diode
Unlike standard low-voltage electronics diodes, a microwave high-voltage diode consists of multiple internal semiconductor junctions connected in series. Because of this high forward voltage drop (typically 6V to 8V), standard multimeter diode tests using a standard 1.5V AA battery will show an "Open Circuit" reading even on a working part.
How to Correctly Test the Diode:
-
Unplug the microwave from the wall socket.
-
Remove the outer metal cabinet.
-
Discharge the high-voltage capacitor by bridging both terminals to the bare metal chassis using a 20,000-ohm, 5-watt resistor or double-insulated screwdriver handles.
-
Locate the diode—it is connected from one side of the high-voltage capacitor to the grounded metal chassis.
-
Unscrew the ground terminal and disconnect the spade connector.
-
The 9V Battery Test Method:
-
Connect the diode in series with a 9V battery and your multimeter set to DC Voltage.
-
Measure voltage with red probe on anode and black on cathode: you should read approximately 5V to 7V.
-
Reverse the leads: you should read 0V (blocking reverse current).
-
Failure Condition: If the diode shows voltage pass-through in both directions or displays 0V in both directions, the diode has shorted out and must be replaced.
-
                  [ 9V Battery (+) ]
                          |
                          v
                 [ Diode (Anode -> Cathode) ]
                          |
                          v
               [ Multimeter (DC Volts) ]
                          |
                          v
                  [ 9V Battery (-) ]

   (Working Diode: Shows ~5V-7V one way, 0V when reversed)
Step 3: Decoding Digital Microwave Fault Codes
Modern digital microwaves from brands like Samsung, LG, Whirlpool, and Defy feature built-in self-diagnostics that display error codes on the front screen.
Use this table to determine whether your fault code requires a simple soft reset or an internal repair:
| Code | Meaning | Resolution Type | Action |
|---|---|---|---|
| F3 / E-1 | Thermistor / Temperature Sensor Open Circuit | Basic Reset / Sensor Inspection | Unplug for 10 minutes to reset board. If code returns, replace sensor assembly. |
| F4 / E-4 | Humidity / Steam Sensor Fault | Basic Reset | Wipe interior moisture and power cycle unit. If code remains, evaluate sensor wiring. |
| F1 / E-2 | Control Board Memory Error (Touchpad Failure) | Professional Assessment | Disconnect power for 15 minutes. Persistent errors require control board or touchpad replacement. |
| F6 / Door Lock | Door Microswitch Relay Misalignment | Basic Reset / Mechanical Check | Check door latch spring and switch contacts. Realign latch mechanism. |
Performing a Basic Soft & Hard Power Reset
Before buying replacement parts, rule out temporary microprocessor glitches by performing a formal power reset:
Soft Reset (Standard UI Clear)
-
Press the Stop/Clear button twice to clear active program memory.
-
Open and close the door firmly to re-engage the primary and secondary safety microswitches.
Hard Power Discharge Reset
-
Unplug the power cord from the wall outlet.
-
Leave the microwave completely disconnected for 15 to 30 minutes. This clears temporary RAM corruption on the logic board and allows thermal cutouts to cool down and reset.
-
Re-plug the unit, set the clock, and run a 30-second test cycle heating a cup of room-temperature water.
When to Seek Professional Assessment
While replacing a R450 high-voltage diode or a line fuse is manageable for experienced DIYers, certain failures require professional appliance repair services:
-
Magnetron Vacuum Leak: If the magnetron cathode dome has melted or cracked, replacing the magnetron involves handling sensitive high-voltage components and ensuring wave-leakage seals are correctly aligned.
-
High-Voltage Transformer Failure: A shorted transformer winding produces heavy smoking, burning enamel smells, and high current draws that trip household circuit breakers.
-
Door Hinge Misalignment: If the door hinges are bent, microwave energy can leak outside the cavity. Authorized technicians use high-frequency radiation detectors to verify safety before putting the unit back into service.
Summary
-
Don't trash a non-heating microwave immediately: A humming microwave that leaves food cold is usually suffering from a failed microwave high-voltage diode (a simple R150–R450 replacement).
-
Perform the 9V Battery Test: Standard multimeters cannot measure high-voltage diodes directly; use a 9V series circuit to test for forward voltage drop.
-
Reset First: Resolve system error codes like
F3orF4with a 15-minute hard power discharge before ordering replacement sensors. -
Safety Always: Never attempt internal diagnostics without verifying the high-voltage capacitor has been completely discharged.
Experiencing a similar issue? Contact us for a no-obligation quote. We're here to help.
If you know what parts to look for, please visit Tech and Bids to search for what you need.